Search This Blog

Saturday 21 December 2013

Change Company Design Pattern In Microsoft Dynamics AX 2012


By the help of change company design pattern we can change the company context with in a particular scope.

For example there is a scenario in which we have to get the data based on the company context which is not our loggedin company in that case we can use this change company design pattern to change the company context in a particular scope.

You can see the examples in the below links.

Change Company Design Pattern [AX 2012]

Cross-Company Data Modification Using X++ [AX 2012]

Above links for changing the company context were for the particular scope but if you want to change the company context inside the entire form than you can call the below method.

appl.setDefaultCompany(selectedLegalEntityDataAreaId, false);

Note:The main Drawback in above method is that when you switch over from the form on which company context is change than you will got the infolog that company change from this to this.

You can see the detail of that method in the below link:

Application.setDefaultCompany Method [AX 2012]


You can see the existing example of that method.

Just go to the Human Resouce ->Periodic ->Budget Planning -> Forecast Positions

Forecast Position List page will open just double click any forecast position and than click edit button
Forecast Position will open in edit mode.

Now go to the Compensation Group tab of that  form and right click the lookup and click view detail as you can see this in the below image.


Now after clicking on the view detail button you can see the form is open.

This new form will open in the context of the company assigned on the forecast position not based on the logged in LE.And will show compensation groups created in that LE only as you can see this in the below image.


Now on the jumpref method of the form HcmPositionForecast I have right this code.As you can see this in the below image.


This was all related to the change company design pattern.

I hope you like this post.I you have any questions related to that than you comment or feel free to approach me.

Thanks

Muhammad Zahid.

Tuesday 10 December 2013

WorkFlows in Microsoft Dynamics Ax 2012 Part 1


WorkFlows:

                         Workflows is basically a business process that defines how a document flows through the system.

Below are some features related to the workflows on how can we configure the workflows and use them in our scenario.

I will show the example related to the Purchase Requisition in the Module Procurement And Sourcing.

Just go to the Procurement and sourcing > Setup > Procurement and sourcing workflows.

A new window will open as you can see that in the image below.

This page contains all the newly created Workflows.

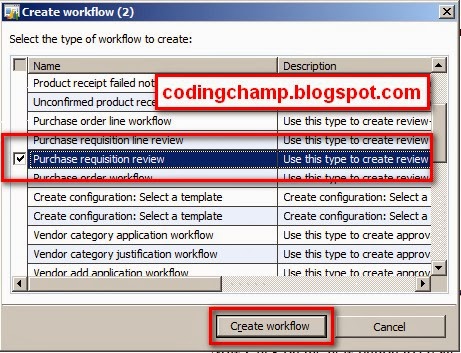
Now Click on the new button to create new workflow.A new window will open where you have to select the type of workflows.

Select the Purchase Requisition Review and than click the Create Workflow Button.

As you can see this in the image below.


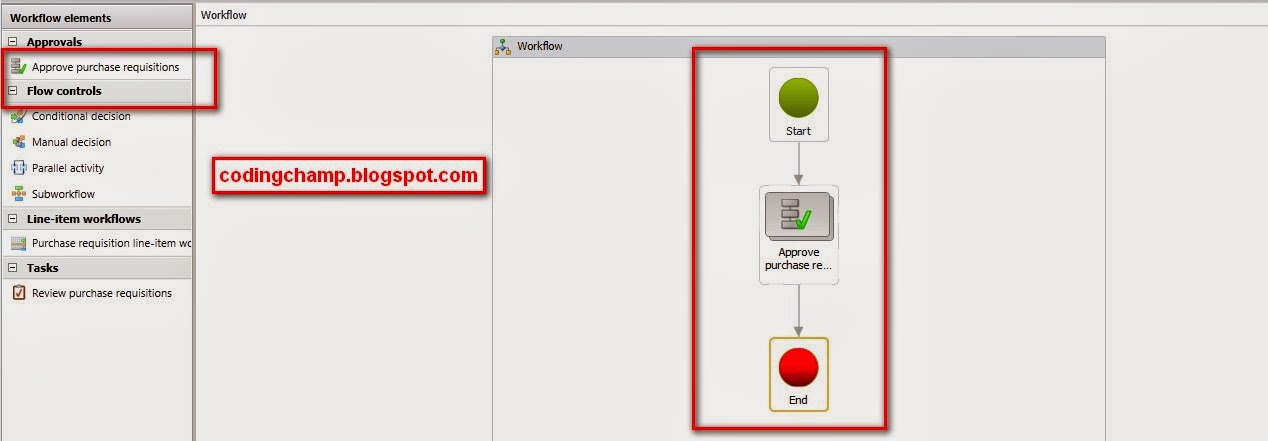
After clicking  on the workflow button A new wizard will open where you have to configure your workflow.As you can see this in the image below.


As you can see in the above image. This is the window where you can configure your Workflow.
On  the below pane there is an error pane which shows number of errors in your workflow during the configuration.You have to resolve all these errors in order to configure your workflow.

On the left hand side there is the task pane where you can use different tasks to add to your workflow.

In the middle there is the action pane where you have to drag and drop the tasks.

Now drag the Approve Purchase Requisition element on to the action pane and than connect the  start and end node to it.

As you can see this in the image below.

Now double click on the approve node in the action pane and than click on the basic settings.
As you can see this in the below image.

After clicking on the basic settings a new node will open where you have to enter basic settings.

Inside the basic settings basically there are four nodes. These four nodes are:

1. Basic Settings.
2. Assignment.
3. Condition.
4. Escalation.


1. Basic Settings

In Basic settings node you have to enter the Subject of the workflow and then information of the workflow.

This subject and description will help the approver of the document.

You can also insert the place holder into  it.

For example if i want to show the Requisition id.Than I can do that through the place holder.Than every approver of the requistion will be able to see the id of the requisition for which he has to approve or not.


2. Assignment:

Assignment is basically use to select the number users which have to approve the document.

There are four types of assignment i.,e participant,hierarchy,workflow user and user.

participants are based on the roles.you can assign this workflow to the specific role and the users in that role can approve that document or you can use organizational hierarchy or you can select the workflow user
or you can assign to the specific user (The user which is configured in AX).

In that example I will use the user option.
Now in next image you can see i am selecting the specific user that is configured in my AX.


Time Limit:

In that node you have to define certain time limit to the user in which the approver have to approve the workflow.

You can see that in the below image.


Completion Policy:

Completion Policy is basically is the policy in which we have to decide when this task is complete.

Like when only single user completes this than it complete or when all approvers approves than this task should be complete.

You can see that in the image  below.


3. Condition:

Now there is third option available is we can add the condition to start the workflow if we want.

For example there is an example that workflow should start if the requisition amount is 2000. Than you can add the condition.

you see that example in the below image.


4. Escalation Policy:

There are certain escalation policies available if the user fails to respond in the given time than  
we can make policy that it should assign to another user we can define the name of the other user or we can add the organizational hierarchy.


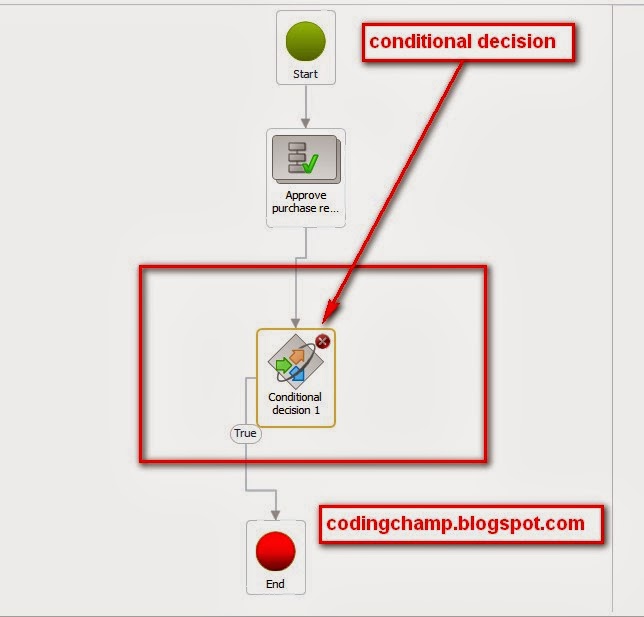
Conditional Decision:

You can add the conditional decision into your workflow.If the decision is true than you can end the workflow otherwise the document can go to other node.

You can see that in the below image.


Now this was all related to the configuration of the workflow.Before saving the workflow please see the error pane there should not be any single error present in it.After resolving all the errors you can save and close the workflow.There will be a dialog box appear you can add version notes in it if you want and than save it.And than activate that version.

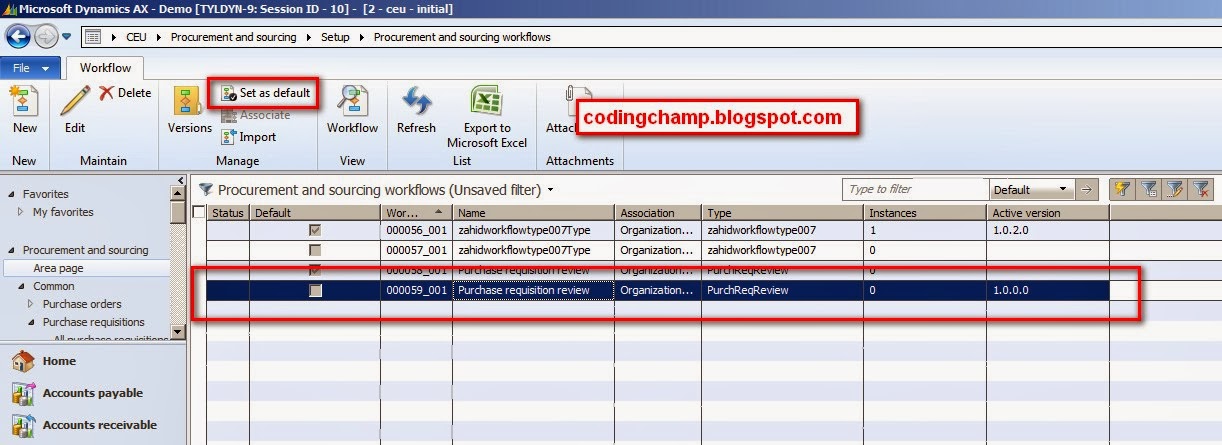
After Creating the workflow please set your workflow as default as you can see that in the below image.

There is also version of the same workflow that you have.

Versions are basically when you modified your already created workflow than there is version created based on your modification.You can activate any of your version you want based on your modifications.

You can see that in the below image.


This was all related to the Configuration of the workflows on the client side.

I hope you like this post :)

In the next post i will show you on how can we consume this workflow while moving our document from one user to another.

In my third post related to the workflows i will also show the technical side of workflows on how can we develop our own workflows.

 If you have any queries you can comment on this.

Thanks Muhammad Zahid.


Info Part in Microsoft Dynamics AX 2012

Info Part:

Info Part is basically used as a fact box on list pages and detail pages.

 The Perfect Definition of infopart is:

An Infolog is a type of part that you use to add a collection of fields and values to the fact box pane of a form, or a preview pane of a list page.

You can see the image of the fact box in the below image:


Now the Scenario is that we have to show the total of budget amount against each earning type for each position on the list page.

To do this we have to create the Query first.which fetch and calculate the sum against each earning type.

After creating the query we have to create our Info Part.

Just go to the Parts -> InfoParts node of the AOT and right click and than create new info part.

As you see this in the below image:

 Now just right click your newly created info part and than set the name of the your query that we have created in the first step.

As you can see this in the below image.


Now right click the layout node and than set the name of the parent datasource that you have made inside of your query.

As you can see this in the below image.


Now go to the group node and than set the name of the parent datasource and if you want to show more than one record in the fact box than you can set the repeating property to yes.

As you can see this in the below image.


Now right click the group node and than select new field.The fields inside the group node are the fields which you want to show on the fact box.

right click that field node and than select the datasource name and the field name and than name the label to that field.

As you can see this in the below image.


Now create the menu item and than set the object type of this menuitem to info part and the object to name of the infopart.

As you can see this in the below image.


Now go to the parts node of your list page or detail page on which you want to show the fact box and than right click than create new part reference and than set the following properties.


Now open your form your fact box should be exactly like this.


Fact Box have many types I have shown only one type in this example.If you want know more about fact boxes than you can click on the below link.

Fact Box in Microsoft Dynamics AX 2012

This was all from my side related to the Info Part.

If you have any questions related to that feel free approach me :)

Thanks

Muhammad Zahid.

Wednesday 25 September 2013

Working with cross company lookups in Microsoft Dynamics AX 2012

There are some tables which have the property save data per company is set to yes.

This means that table save the records as per of the logged in company.You can not see the records of the other company while logging in from the other company.

When we set the property save datapercompany to yes it creates the new column with dataareaid on the table.

Now when we want to see the records of the company while logged in from the other company than we have to use the cross query.

Like there is an example that you have to show the lookup with records other than the loggedin company than you have to use the below query.

As you can see this in the image below.


In the above query I have just use the two key words which allows the records to be cross company and than I have filter the records based on the passed DataAreaId.

As you can see this below.

query.allowCrossCompany(true);
query.addCompanyRange(strFmt(_selectableDataArea));

This was all related to the cross company query.

In the next post i will show you that after selecting the value from the lookup using the cross query how can we insert data into the table without any error.

Thanks

Muhammad Zahid.

Tuesday 13 August 2013

Modifying the Form DataSource Query in Microsoft Dynamics AX 2012

Hi its quite easy  in Microsoft Dynamics AX to modify the query of the form on some scenarios.

Like there is the scenario in which i want to show all number of positions when user click the assign button and shows only those positions which have cost element assigned  when the user clicks the update button.

Just consider the scenario when the user clicks the assign button.
The below form is open containing all the forecast positions inside the grid.


And when the user click the update button only those positions will be shown which have cost element assigned.

As you can see in the image below.


This change is just because of we have override the datasource init method and modified the query.

Just go to the form datasource on which you want to modify the  query in my case i have hcmpositionforecast datasource.

Just go to the its datasource methods and than right click and than override the init method.

inside that method write the form datasource query and than modify it based on your scenario.As you can see this in the image below.


Thanks

Muhammad Zahid.

Saturday 22 June 2013

Using RecordInsertedList To Insert Multiple Records In Single Database Transaction

RecordInsertList Class:

The RecordInsertList class provides array insert capabilities in the kernel.   

RecordInsertList Class is really very helpfull class to increase the perfomance  while inserting  the bulk records.

Like there is a scenario where you are inserting the bulk records into the table using the while select one by one.In this case if there is a scenario where you are trying to enter the 100 records one by one than its means that you are trying to hit the database 100 times.

Now by the help of the RecordInsertList Class.We can easily insert these 100 records in single database trip.

Below is the example of how can we use the RecordInsertListClass:


As you can see in the above image that I have Declare the RecordInsertList object and than I have assign the values to the table buffer and than I am going to add the table buffer to the RecordInsertList object and one all buffers are added to the list I am going to insert them into the database.

This was all from my side ralated to the RecordInsertList.I hope you like that.

Below is the link of msdn for more detail explanation about that:

RecordInsertList

Optimizing Record Inserts

Thanks

Muhammad Zahid

Thursday 30 May 2013

Adding Lookup with custom range on Forms In Microsoft Dynamics Ax 2012

Its quit easy in Microsoft Dynamics AX 2012 to create the lookups.

Lookups are basically the drop down list through which we are selecting the value and then setting the value behind that field.

You can see in the below image on what lookups are and how they work.


  In the above image when we click the add button or click the purpose field then the lookup is open.You can make these kind of lookups in your own forms.

Below are the steps for making the custom lookup with your define ranges.

 Step 1:

First on the form -> DataSource right click the field on which you are making the lookup and than select the override method lookupRefrence().

As you can see in the below image.


Now you can see whats inside that method.


Actually in the above code I am calling the another method that I write on the table level.Inside that method I have make the logic of the lookup.

In the below image you can see the logic of that method for making the lookup.


Basically in that Method I have made the query which fetches the record based on our criteria and than we make lookup on the based on the fetched data and than return it to the form.From where it was called.

That was all from my side related to the custom lookups.

I have also see a very good link related to the lookups.You can also check this.

Custom Lookups 

If you still have any questions related to the custom lookups than feel free to post it on my blog.

Thanks

Muhammad Zahid