Search This Blog

Wednesday 31 October 2012

Coding Best Practices In Dynamics AX 2012

There are some coding best practice strategies that every one should follow to avoid Best Practice Errors.

1. Use camel cases for all the member variables i.e serverClass (First alphabet of the work should be small and second alphabet should be capital).

2. Use Pascal Case Naming  Convention for application Object Tree Elements.

e.g:AddressCountryRegion

First letter of each word should be capital.

3. Parameters Names in Methods should start with _ (underscore).

4. Do not encode the type of a variable in its name eg strName (This is wrong).

5. Do not use multiple comments use only single line comments.No matter how many lines the comment contains.

6. Do not use comment at the end of the line.Unless the comment is very small
e.g: int count; //-1 indicates.

7. Remove Todo comments in advance of a release.

( Todo Comments are basically the comments of code that this code contains bug we will fix it latter or etc.)

8. XML Documentation is  basically the Description  of the method and  its parameters.

We must place XML Documentation above every method.

To create the XML tags place /// above the method or right click
scripts->documentation->HeaderTemplate.

9. Put the method calls inside the conditions so if call are fails than method calls cost will reduce.This is benefit of taking less time consuming.

10. Use field list in select statement.

11. Use Extended Data Types whereever possible.

12. For constant values that are use in multiple places in code you should use #define to define macro that has the constant value.

Example for defining Macros.

#define. MacroName('value')

Example for using Macros.

variable=#Macroname.

13. Use local variables as more as possible.

14. Avoid Global variables as more as possible.

If  you want to explore more in Coding Best Practices than here is the link below:

http://msdn.microsoft.com/en-us/library/gg865121.aspx

Thanks

Muhammad Zahid.
 

Friday 19 October 2012

Unit Test Framework In Microsoft Dynamics AX 2012

The Unit Test framework is tightly integrated into the MorphX IDE of Microsoft Dynamics AX. This integration is very important to test-driven development (TDD) because a unit test can be created alongside the feature code it is testing.

What is a Unit Test:

A unit test is code that verifies that feature code has been implemented correctly. If you adhere to the principles of TDD, it is best for the developer who is writing the feature code to first write the unit tests. This puts emphasis on how feature code is consumed and creates a more user friendly application programming interface (API). A unit test, in the context of the Unit Test framework, includes test cases, how test cases are staged with data, and the organization of test cases. A test case is a class that extends the SysTestCase Class class. You can add test methods to test each requirement of the feature code. You should execute test cases when code is changed.

Some Important Points:

Every test case class should extend  SysTestCase Class.

For testing purpose you can write multiple methods for single actual method in code.

For Classes their should only one class for testing a single class.

Name the test class same as the class followed by test in the end.

Name of the method in the test class should also contains test  in the start.

We write Unit Test for classes and tables only.

Always Testing will be done on Blank Database.

The attribute that must be placed on the unit test case class is:

[SysTestTargetAttribute('SysDictTable',UtilElementType::Class)]

The attribute that must be  placed above the method of the test case is:

[SysTestMethodAttribute]

Methods for Setting Data:

Two types of methods are use for setting up data.These are:

1. Setup Method.

2 Setup Test Case Method.

1.Setup Method:

Setup Method runs before every Test method.For some times we usaually want fresh data so we write code in setup method.It works like this:First setup method executed than test method executed than tear down method executed than again setup method executed with fresh data than second test method executed and so on.

2.Setup Test Case Method:

Setup Test case method runs only one time when test class is executed.In case of setup test case method it executed only one time and than tear down method for setup test case method will execute in the end.

note:Due to some issues we usually dont use i.e override setup test case method we only use setup method.

Tear Down Method:

Tear Down method is basically use to flush out data.We normally dont override this method.It manages Automatically.

A test method will typically contain several assertions that are required to hold true,for the test to be successful.

Note: The use of the assertEquals method.This method,and other assert methods,are available as part of the SysTestCase framework.These methods also have an optional string parameter called _message,to specify the message that would go into the infolog.If the assertion fails.The following is list of available methods:


Now I will show u the simple example on how to use the Unit Testing.

Create a simple class that contains add,subtract and multiply methods.

Now Create the Unit Test to Test this classes.The original class on which I have made these methods is Calculations.Now for unit test first we will override the setup method.


public class calculationtest extends systestcase
{
calculation obj;
}

pulbic void setup()
{

 obj=new calculation();

super();

}

public void testadd()
{
this.assertequal(3,obj.parmadd(1,2));
}
public void testmultiply()
{
this.assrtequal(9,obj.multiply(3,3));
}

Class Declaration:

[SysTestTargetAttribute('calculation',UtilElementType::Class]
public class calculationtest extends SysTestCase
{
calculation obj;
}

Methods:

[SysTestMethodAttribute]
public void testadd()
{
this.asserEquals()3,obj.add(1,2);
}

[SysTestMethodAttribute]
public void testsubtract()
{
this.assertEquals(1,obj.subtract(1,2));
}

[SysTestMethodAttribute]
public void testmultiply()
{
this.assertEquals(9,obj.multiply(3,3));
}

Running Test Cases:

Now right click the test class i,e is calculationtest and than go to add ins than click the run test tests as
you can see in the below image:


Now after running the unit tests you can see in the above image that the how much methods are runs how much are fail as you can see in the image.


You can also record the code coverage of the code just click on the parameters button as you can see in the above image.

A new screen will open.Now check the checkbox record code coverage and record number of records.as you can see in the below image.


Now click on the Listener as you can see in the above image and select infolog.This is for when some exception occur than it will be show in the infolog.

Below is the screen for the infolog.

Now close the above form and than again run the unit test and than click the details button as you can see in the 3rd last image and a new form will open and where you can see the code coverage.

The recomended code coverage of the class should be 60%.

You can see the code coverage of my class in the below image:


You can also see the code coverage of the methods also.Just select your recently run testcase and than click the test button as you can see in the above image.

A new form will open which shows the code coverage of the methods as you can see in the below image.

 
Thanks
 
Muhammad Zahid.


Saturday 13 October 2012

Queries In Dynamics AX 2012

Types Of Queries :

There are three types of queries in dynamics ax 2012:
1. Inline Queries.
2. Aot Queries.
3. Queries objects and API.
1. Inline Queries:
Inline queries are similar to the Linq queries in dot.
In inline queries you need to create the table buffer.
Table Buffer is quite similar to the objects in classes.
In Dynamics Ax tables can also be treat as a classes where you can write your own methods.
Below is the simple example of inline queries.
CustTable custTable;
 select AccountNum from custTable order by AccountNum where custTable.AccountNum>="1000";
info(custTable.AccountNum);
I you want to show all the records in the info box than we use while statement
while   select AccountNum from custTable order by AccountNum where custTable.AccountNum>="1000";
{  
 info(custTable.AccountNum);
 }
We can also use aggregate functions  in  inline queries.
Here is the example given below:

 select count(AccountNum) from custTable where custTable.AccountNum>"1000";

info(custTable.AccountNum);

Joins in Inline Queries:
Lets make it little bit more interesting by using joins:
HcmBenefit hcmBenefit;
HcmBenefitPlan hcmBenefitPlan;
while select * from HcmBenefit join HcmBenefitPlan
where hcmBenefit.BenefitPlan==hcmBenefitPlan.RecId
{
info("%1,%2",hcmBenefit.BenefitPlan,hcmBenefitPlan.RecId);
}


Group By Clause in Inline Queries:


Group by clause is basically use when we use aggregate functions.Lets see an example:

while select count(RecId) from hcmBenefit
join Description from hcmBenefitPlan
 group by hcmBenefit.BenefitPlan,hcmBenefitPlan.Description
where hcmBenefit.BenefitPlan==hcmBenefitPlan.RecId
{
info(strfmt("%1,%2",hcmBenefit.RecId,hcmBenefitPlan.Description));
}


Inline Queries -Select Options :


If you want to explore more than you can refer to the following link:
 
 
Simple Insert,Update,Delete:
Insert:
Student  student;
student.name="muhammad zahid";
student.insert();
Update:
select forupdate from student where student.name=="muhammad zahid"
if(student.RecId>0)
{
ttsbegin;
student.name="Baber Tareen";
student.update();
ttscommit;
}
note:The if check was only to check that if the record exist or not that i have fetch.You can remove this if check if you want.
Delete:
select forupdate from student where  student.name="Baber Tareen";
if(student.RecId>0)
{
ttsbegin;
student.delete();
ttscommit;
}
Insert And Update multiple records at a Time:
For inserting multiple data at a single time we use insert_recordset and for updating multiple data at a single time we use update_recordset 
update record set
insert_recordset:
insert_recordset myTable(myNum,mySum)
select myNum,sum(myValue) from anotherTable
group by myNum where myNum <= 100
note:here mytable is the table in which we are inserting the bulk record and the fileds are those in which we inserting data and than the select query which fetch the record whic we are inserting in our table.    
update_recordset:
update_recordset student setting
name="zahid";
the above code will update all the names fields to zahid.You can also use where clause to update the selected record set.
The pseudo code for the update record set is:
update_recordset my TableBuffer setting
field1=1,
field2=fieldX + filedY
where field1==0


AOT Queries:

AOT Queries are those queries that we made in AOT by the help of the wizard.

below is the image of the AOT Queries.


Calling Aot Queries:
 
HcmBenefit hcmBenefit;
 
HcmBenefitPlan hcmBenefitPlan;
 
Query q=new Query(queryStr(BenefitQuery));
 
QueryRun qr=new QueryRun(q);
 
while(qr.next())
{
hcmbenefit=qr.get(tableNum(hcmBenefit));
 
hcmBenefitPlan=qr.get(tableNum(hcmBenefitPlan));
 
info(strfmt("%1,%2",hcmBenefitPlan.Description,hcmBenefit.RecId));
}
 

Query Build API:

Query:
 
Contains the definition of the query.Can consist of one data source or several data sources if they are related.
 
Query Run:
Class use to execute the query and loop through reuslt.
 

Query Build DataSource:

Links to one datasources in query.
 
Query Build Range:
 
Enables the end user to limit the result by adding a value in the specified query range.
 
QueryBuildFieldList:
 
List of all the fields in data source.
 
Query Build Link:
 
Links two data sources in a join.Is set on the child data source.
 
Using Aggregates and Sorting:


Using Joins:


some usefull links so you can deeply explore.


Thanks
 
Muhammad Zahid. 


Thursday 11 October 2012

Map and MapEnumerator Class

Map Class:


                       The Map class lets you associate one value, that is, the key, with another value. Both the key and value can be any valid X++ type. This includes objects. The types of the key and the value are specified in the declaration of the map. The way in which maps are implemented means that access to the values is very fast.

we can also assign our hard coded key value and value in maps.

I will show you the little example on how to implement Maps.This will make more clear concepts.

Map zahidmap;
 
zahidmap=new Map(Types::Integer,Types::string);
 
zahidmap.insert(1,"Muhammad Zahid");
 
zahidmap.insert(2,"Asim Saeed");
 
zahidmap.insert(3,"Baber Tareen");
 
if(zahidmap.exist(1))
{
info(strfmt("%1",zahidmap.lookup(1)));
}
 
if(zahidmap.exist(2))
{
info(strfmt("%1",zahidmap.lookup(2)));
}
 
if(zahidmap.exist(3))
{
info(strfmt("%1",zahidmap.lookup(3)));
}

In the above code I have just created the map with key value type=integer and value type =string
than I have inserted the key value and value into the map and than i have just made an if  check whcich checks that if this key is exist or not and by m.lookup method i just return the value against the key that I have passed into the parameter.

Output:


MapEnumerator:

 
The MapEnumerator class allows you to traverse through the elements within a map.
 
Example:
 
This example is proceeding from the above created example.
 
As I have already created the map.Now in this example i will assign this map to the map enumerator.

MapEnumerator zahidmapenumerator;

zahidmapenumerator=zahidmap.getEnumerator();

while(zahidmapenumerator.movenext())
{
info(strfmt("%1",zahidmapenumerator.currentvalue()));
}

The outpur will be the same as you can see in the above image.

Thanks

Muhammad Zahid.


Wednesday 10 October 2012

Assigning roles in Sql Server 2008 R2

Go to security => login tab of the security tab of  Sql server 2008 R2 right click and than select new login as u can see in the below image:


Now click on the new login and than enter the login name as u can see in the image below:


Now click on the server roles and check the roles you want to assign to that user as you can see in the image below:


Now click on the user mapping than check the database on which u have to assign the role related to that database and than select the checkboxes below which shows the roles related to selected database as you can see in the image below.


Now check the another database and than repeat the steps as I have stated above.

Thanks

Muhammad Zahid.


Error 3154:The backup set holds a backup of a database other than the existing 'AXDBDEV' database


This error message  will produce when we restore our database from the database backup file:

There are following easy steps to resolve this issue:

Step 1: 

First right click the existing database which you want to restore than go to:
 
task => restore => database
 
as you can see in the below image:


Step 2:

A new wizard will open.Now click on the options then check the checkbox
 
"Overwrite the existing database (with replace)" 
 
as you can see in the below image.


Now perform the rest of the steps for restoring the database.The error message will not be produce again.
 
 
Thanks
 
Muhammad Zahid.


Wednesday 26 September 2012

Policy Framework in Dynamics AX 2012

Policy Framework:


The policy framework can be used to enforce rules for the Microsoft Dynamics AX 2012 users to help improve the business process. Below are the three key components of the robust policy framework in AX 2012.
  1. Policy Types.
  2. Rule types.
  3. Policy rules.

Policy Types:


A Polciy type is a collection of all the rule types that are applicable to a given module or feature area.
 
A user in a manager role can be granted permission to define policies of a given type through a menu item that opens a list page.The list page displays all the policies of a particular policy type.
 
Microsoft Dynamics AX 2012 ships with six policy types.These types are specified with the following SysPolicyTypeEnum enumeration values:
 
  1.  Approval Policy.
  2.  Audit Policy.
  3.  Purchasing Policy.
  4.  TrvExpensePolicy.
  5.  TrvRequisitionPolicy.
  6.  VendInvoicesPolicy.

Rule Types:


Each Policy type encompasses an entire feature area;its associated rule types categorize the rule that can be set up for specifix features within that area.For example,airline,hotel,and meals are examples of expense policy rule types.
 
Each Policy type can have any number of related rule types.
 
Unlike policy types,which are static and well known,rule types do  not have to predefined(although they generally  are).For example,the AuditPolicy and VendorInvoicePolicy policy types allow the user to define the rule types that are to be enforced.Rule types for these two policy types do not ship with Microsoft Dynamics AX 2012.All othe types have a predefined set of rule types that do ship with Microsoft Dynamics AX 2012.

Note:Audit Policy Type and Vendor Invoice Policy Type dont have predefine rule type they allow the user to create their own rule type while the other policy types have predefine rule types.

Policy Rules:


Policy rules is basically that kind which holds the data based on that policy will become active or inactive.the best example for this is such a limit can be that the employees can incur a maximum of $1500of airlines for their travel and if their expense exceeds the limit than they have to provide the justification.

Creating a Policy Type:


To create a new policy type,complete the following steps
 
1. Add a new value for the policy type to the SysPolicyTypeEnum base enumeration.
 
2.Create a row for the new policy type in the SysPolicyType table.
 
To create a row for the new policy type in the SysPolicyType table there is simple easy step

Create a new method in SysPolicySetupClass like the below:

private void loadzahid532policy()
{
SysPolicyType policyType = SysPolicySetup::addPolicyType(SysPolicyTypeEnum::zahidpolicy532,HierarchyPurpose::ExpenseControl);
}
 
 
In the above code the HierarchyPurpose shows the purpose of  policy on behalf of that the policy will  open and zahidpolicy123 is the name of the enum that we have created in the step one.

Now call this above newly created method from the loaddata() method of that class i,e SysPolicySetupClass.
 
Now write a simple job to load that policy into the SysPolicyType table as given below.

static void Job1(Ards _args)
{

SysPolicySetup obj=new SysPolicySetup();
obj.loadData();
info("done");

}

Now after running the job the policy will be  inserted into the SysPolicyType table.

Now to open the Policy form you have to create the display type menu item.
 
In that menu item you have to set some properties:
 
Set ObjectType=Form
 
Object=SysPolicyListPage
 
EnumTypeParameter=SysPolicyTypeEnum.
 
Enum Parameter=name of the enum that you have created in the SyspolicyTypeEnum in step 1
 
Paramters=Enum value of the above enum that you have created in step 1.
 
Below are the screen shots of my menu item properties and the enum properties:


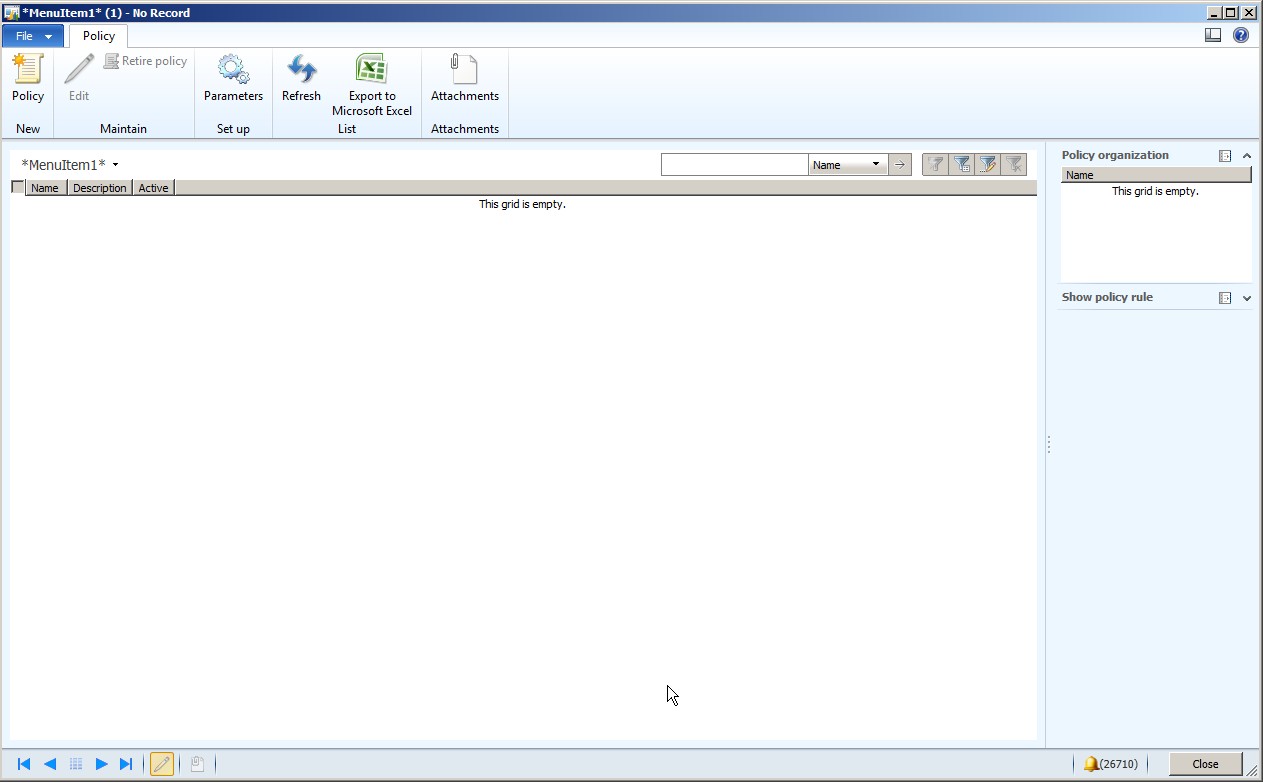
Now open that newly created menu item and the Polic form will open like the given below:


Now click on the new policy button as you can see the button in the above image.

when you click the button the new policy creation form will open like this given below:


note:When you open the above form the warning message will appear like the given below:


To remove this warning when opening the form just click on the parameter button as you can see in the second last image.The new form will open like given below:


Now select the Companies from Organizational types and than click on the add button and than close the form.
Now the warning will not appear.

Now as you can see in the third last image that there are no rule types are shown.This is because we have not created the rule types.Now we will create the rule types.

Creating a Rule Type:


Now add the below line of code in the method loadzahid532policy() that we have created above in the previous steps.
 
SusPolicySetup::addRuleType(policytype,SysPolicyRuleTypeEnum::TrvAirlinePolicyRule,formStr(TrvPolicyRule));
 
The above code will add the rule i.e TrvAirlinePolicyRule in our new created policy.
 
 Now again run the job again that we have created in the previous steps.
 
 Now rule type is added in our policy as you can see in the below image:


 Microsoft Dynamics ax ships with many rule types.You can create many rule types as you want in a single Policy.
 
Now the next step is creating Policy Rule.
 

Creating Policy Rule:


Now click on  Airline and than click on the CreatePolicyrule button as you can see in the above image.

An exception will generate as you can see in the below image.

This exception has taken my 2 days to fix :( :(


The scene is that when we click the button i,e create policy rule.A new form i.e TrvPolicyRule
is open.
 
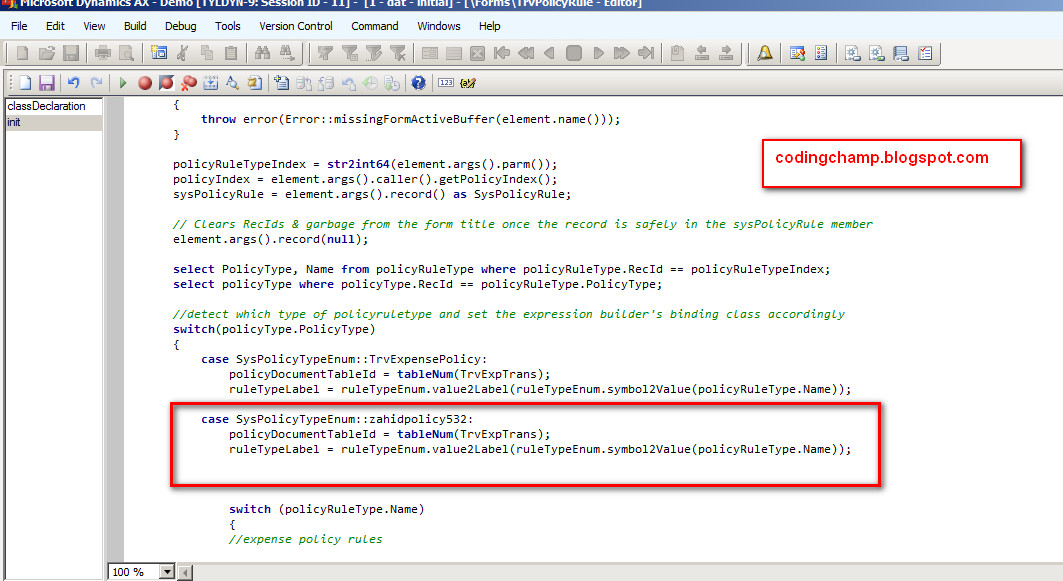
Inside the init method of that form there are several switch cases present as you can see inside the init method of  the form TrvPolicyRule.
 
Basically these switch cases are checking from which syspolicytype enum these form is called and than setting the data according  to them.
 
In our case we have created our new type enum and the swich case of our newly created type is not present in the code therefore it was throwing an exception.  
 
Note:Only in case of travel expense and travel requisition we need to insert the cases.
 
As you know i am implementing travel expense policy therefore i will add the switch case for
setting the travel expense below is the screen shot available:


 Now again click on the button create policy rule.as you can see in the image below.


 after clicking the form a new form will open as you can see in the below image.


Now the above form is for creating the policy rule for the Airline expense.

I have created the rule that if the user expense is greater than  1000 than he has to enter the justification why his expense increases the limit.

 
Now press the ok button.Your Policy is created successfully.

Note that the policy needs to be active to take effect.

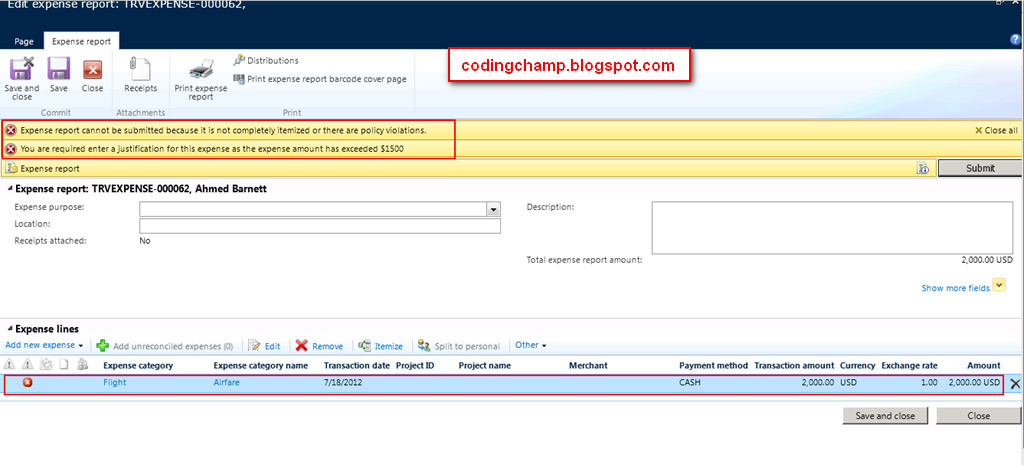
Now you can see in the below image that how this policy works when the user goes into the Employee self-service portal and creates his expense report for the airlines expenses and tries to submit it.


Now you can see in the above image that the policy framework’s warning icon gets activated which we have setup back in the expense policy for airlines. just because of his expense has exceeds the limit that we have set. He will now have to go to the expense line again and enter a justification for this expense exceeding maximum allowed amount, for him to be able to submit the expense report.

As you can see in the below image.

 
The Microsoft Dynamics AX 2012’s policy framework is flexible enough to define any number of very simple to complex audit policies across your organization under the Expense Management, Vendor invoices, purchase orders etc. areas, there by allowing your admin staff and reviewers focus on their day-to-day work more, rather than spending time in evaluating business processes violations manually.
 
 
Thanks :) :) :)